Tuesday, December 20, 2011

History of the Pavlova

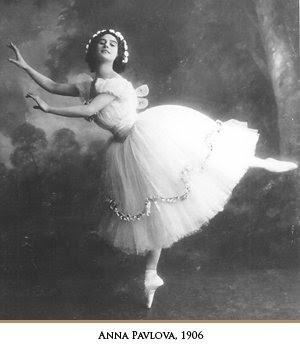
The traditional pavlova is made with meringue which is baked until crusty and topped with whipped cream and fresh fruit such as kiwis and strawberries. No one truly knows who first created the pavlova. There is a controversy between New Zealand and Australia about it although they seem to agree that it was inspired by the famous Russian ballerina, Anna Matveyevna Pavlova. 
In 1926 the ballerina toured Australia and New Zealand. A Pavlova biographer, Keith Money, wrote a book called Pavlova: Her Life and Art. He wrote that a chef at a hotel in Wellington, New Zealand invented the dessert when the ballerina visited there on her world tour in 1926. He was inspired by her tutu draped with green silk cabbage roses. The basic shape of her tutu was represented by the fluff of meringue and whipped cream and the cabbage roses by the slices of kiwi. 

Australia also claims that they originated the dessert. Chef Herbert Sachse from the Hotel Esplanade in Perth, Australia claims that the pavlova was created as a tea dessert for their afternoon teas.


No matter who created the pavlova I think you'll agree that it is very delicious and melts in your mouth! This was my first try at making a pavlova and I really enjoyed it! I hope you try out this recipe! It's from the Cook Yourself Thin cookbook! For the whipping cream I just added powdered sugar and a splash of vanilla to give it more flavor!


Chocolate Pavlova
from the Cook Yourself Thin cookbook
For the pavlova:
4 egg whites
1/4 teaspoon salt
1 cup sugar
1/2 teaspoon lemon juice
1 tablespoon cocoa powder

For the toppings:
1 cup whipping cream
1 cup fresh raspberries
1/4 cup shaved dark chocolate
1/4 cup chocolate melted & mixed with 1 teaspoon of veg. oil for drizzling


Directions:
1. PREHEAT the oven to 300 degrees and line a baking sheet with parchment paper.

2. WHISK the egg whites and salt on high speed until they hold their shape. Add the sugar gradually until the mixture stands in firm peaks.


Add the lemon juice and whisk just to incorporate.


Sift the cocoa powder into the bowl of meringue.

Gently fold cocoa powder into the meringue using a plastic spatula. Do not over mix or you will lose the rippled effect.

Pour the meringue onto the parchment-lined sheet pan in an oval (or round) shape.


Place into the bottom of the oven and bake or 1 hr and 15 minutes.

3. SWITCH OFF the oven without opening the door and leave the pavlova in the turned-off oven for one hour. Remove and set aside.

4. FOR THE TOPPING: Whisk the whipping cream, 2 tablespoons of powdered sugar, 1/2 teaspoon of vanilla extract into semi-stiff peaks and spoon on top of the pavlova.


Sprinkle with raspberries, shaved chocolate and finish with drizzled chocolate before serving.

                                                      It does resemble a tutu, don't you think?


Thank you for visiting my blog!

Monday, December 5, 2011

My First Pair of Pointe Shoes


When I went to get fitted for my first pair of pointe shoes, I was excited. My mom and I went to the Sock Basket. My cousin, Ashlyn, was there also trying on pointe shoes.  I had to put toe pads on before I put my pointe shoes on. The sales clerk helped me put on the pointe shoes. Miss Lara, my dance instructor made sure that they fit me properly. I learned how to sew the ribbons and elastics on at ballet camp. What bothers me the most about wearing pointe shoes is that they hurt. When you put cotton in them they don't hurt as much! What I love most about them is that it's easy to get on pointe.


This picture is when I am on pointe for the first time!

 In this picture I am doing a plie.

 Here I am with my cousin.


Here I am with my new pointe shoes!


This is me in ballet pointe camp.


~~~~~~~~~~~~~~~~~~~~~~~~~~~~~~~~~~~~~~~~~~~~~~~~~~~~~~~
Here I'm performing on the last day of ballet camp.
~~~~~~~~~~~~~~~~~~~~~~~~~~~~~~~~~~~~~~~~~~~~~~~~~~~~~


Thank you for reading my blog!


Wednesday, April 20, 2011

Practice Makes Perfect!

When it comes to baking the perfect cupcake practice makes perfect! That saying is also true when rehearsing for the year end ballet recital. Here are some videos of me with my ballet class during dress rehearsal. (I'm the one in front, last to enter) We have been practicing for weeks! This is our last year of Pre-Pointe! We will be getting our pointe shoes in the summer for ballet camp! I'm so excited!!! 


Here is another part to my recital. I'm the one wearing  a braid.


...and another.

...and one more!


Thank you for reading my blog! Keep your eye out for my next blog which will be all about the luscious baked confection called Pavlova. It's named after a famous ballerina!

Wednesday, April 6, 2011

A Blast from Christmas Past...The National Gingerbread House Competition~Grove Park Inn

It was very thrilling to win 2nd place in The National Gingerbread House Competition at the Grove Park Inn this past Christmas! I was very excited that my cousins, my Auntie Erica, Bela (grandma), Daddy, Mama & brother were there to support me. My family screamed and cheered when the announcer called my name for the top ten finalists and finally for placing 2nd in the youth 9-12 division! I know it's spring but I wanted to share this here since I had not yet started my blog when this exciting event took place!
I posted lots of photos!
Hope you enjoy!


I made the fairy wings using rice paper and food color markers. First I drew the design on a piece of paper... then I placed the rice paper on top and traced it very carefully with the markers. To make them shiny I spread a very thin layer of clear piping gel on one set of wings and sprinkled it with edible glitter.This was my first attempt at making edible fairy wings.


Here I am designing and creating the doors using gum paste. Can you see my undecorated gingerbread house in the background? I had to use lots of royal icing to hold the sections together. Absolutely all of the materials I used were completely edible! Those are the rules!

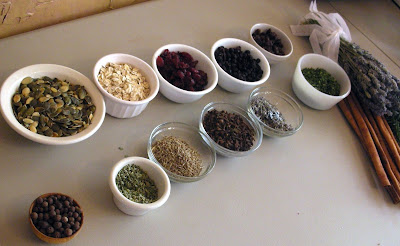
Mama laid out all the spices for me to use to decorate with. I used pumpkin seeds, oats, dried cranberries, raisins, dries blueberries, whole nutmeg, chives, parsley, rosemary,dried rose petals, dried lavender, whole cloves and cinnamon sticks.


Here is where the fairies come to eat.


I used dried orange slices and cinnamon sticks.


Mama and I were warmly welcomed to the Grove Park Inn to drop off my entry!


Run, Run, as fast as you can! You can't catch me I'm the gingerbread car!

Putting the finishing touches on my gingerbread entry.

Here are a few pics of me with my family after the competition ended.


With my Bela & Auntie Erica.


With my cousins.


Here I am with Colette Peters! She was one of the judges!


One of my favorite pieces in the adult division was the porcelin doll and hobby horse entry. It looked very realistic.


This won ist in my division. The girl who made this was 12 yrs old! I love the beach theme!


Here I am to pick up my gingerbread fairy house after it has been on display at the Grove Park Inn during the Christmas season. I'll be back again this year!